


I’ve been experimenting with how to patina using DIY patina paint and household chemicals, and I have to say, it’s absolutely fascinating – and fun!
I love seeing a plain, boring, dull bit of metal transform into something beautiful. Chemistry truly is one of nature’s decorators. It’s fascinating how you can achieve different colours using different chemicals.
Not to say I have delved into this widely as yet. My research proved that there are so many different ways to produce sometimes surprising colours. For the sake of this blog, though, I thought it would be more fun – and accessible – to explore what household chemicals can do to create patinas.
I decided to use four metals that are most commonly used when fabricating household decor: Bronze, Iron, Copper and Brass.
Metal Powders should not be inhaled or ingested, so please make sure you wear appropriate PPE.
In addition, make sure you handle the chemicals used to patina the metals in a very well ventilated space, and wear skin, lung and eye protection at all time. Never mix chemicals unless you know what you are doing.
Never, ever mix ammonia and bleach, vinegar and bleach, or Isopropyl (or Rubbing) Alcohol and bleach.
Patination and rusting are, at it’s simplest, the result of oxidation of the metal. Some chemicals can accelerate the oxidation alongside other chemicals.
The colour and texture can depend on the chemical used, the metal, how long the chemicals have been in contact with the metal, and the temperature.
You will need:
Step 1 – Measure out the powder into a cup. The amount you will need will depend on the size of your project. If in doubt, mix a small amount to begin with – you can easily mix more.
Step 2 – Measure your binding medium into a cup. The ratio needed will depend on the binder you use. PVA is quite thick and sticky, so you will probably need to water it down a little.
Step 3 – Mix the powder and medium together well. And voila! You have just made your own DIY Patina Paint! Pretty easy, huh?
The consistency of the paint should be fairly fairly thick, but not tick enough that it cracks on the project when it has dried. Mine was about the consistency of double cream.
It’s not the end of the world if it cracks. The first coat probably won’t cover well, so you’ll need a second coat anyway. Cracks will just add texture to the final patina.
It’s also not a huge problem if your paint is a bit runny – you’ll just have to add more coats until the project is well covered. Make sure you dry the last coat properly, and stir the paint very well between coats as the metal powder may have sunk to the bottom.
For the sake of this experiment, I’m using common household chemicals. There are may more chemical you can use to patina metals though. If you would like to explore further, this page is a great resource for discovering new ways to patina different metals. As always when using chemicals make sure you seek excellent advice from experts before mixing any chemicals together, and make sure you use the appropriate PPE.
A with any paint project, you’ll need to prepare your surface well.
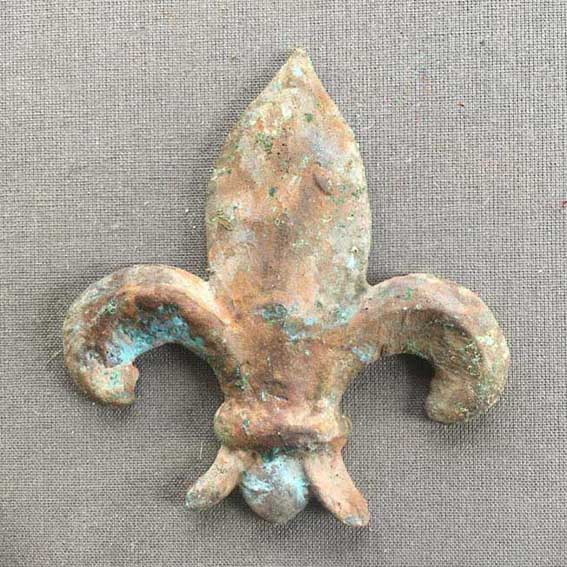
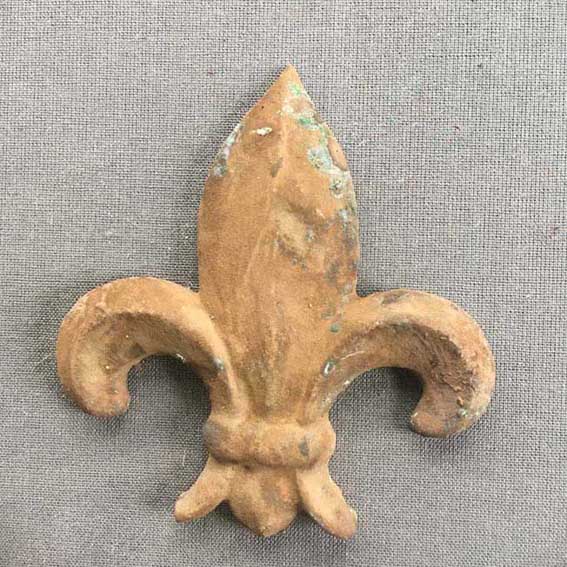
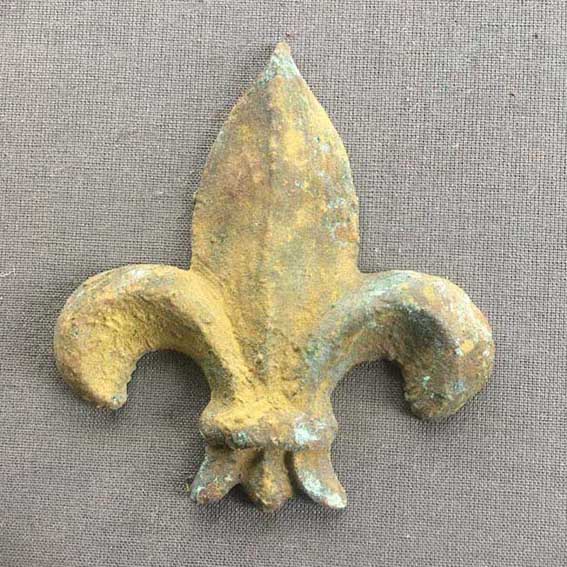
I used fleur-de-lys mouldings in the brown colour (which is a pigment added when I mix the resin) to demonstrate these processes. This was so that if I missed any spots when painting it, or if some of the patina gets knocked off somehow, I won’t be left with a glaring white patch.
Step 1 – Lightly scuff up the surface using sandpaper or a sanding pad. You don’t need to roughen it up much. It’s just to give the medium something to grab onto.
With this technique, it’s not so bad if the surface is a bit rough, because the paint will cover it, and the patina process always adds a lot of texture anyway.
Step 2 – Clean you project thoroughly using an appropriate cleaner for your surface. Isopropyl Alcohol or turpentine will usually do the trick, or sugar soap (TCP) on more delicate surfaces. Let it fully dry off.
3 – Paint your pic with your DIY Patina Paint. You’ll probably need at least 2 coats, depending on the thickness of your paint.
4 – Once your paint is fully dry, it’s time for the really fun stuff – corroding the metal powder to create the patina – scroll down for more about this.
5 – Once you have achieved a patina you like, rinse off your piece with water to prevetn further patination and leave it to dry completely.
6 – Seal the patina in using a clear varnish. This will both protect the paint and patina and prevent the patina developing further. The varnish can be water or solvent based. I tend to use a matt or satin varnish because I like a more authentic looking patina. That’s my preference anyway. You are creating an art piece after all, so if gloss is your thing, go for it.
If you are eager to get going and would prefer not to read through all my methodology, scroll to the end for my recommendations on how to get certain colours and textures.
I used a paintbrush to wash the surface with white vinegar. Then I sprinkled some course and fine salt over top of the vinegar. The copper immediately tarts to show some discolouration.
I left this in the open air to see if any other changes would happen,
There was still no more change. I think this was because the surfaces had all dried out. I therefore decided to attempt to reactivate everything by spraying with a little water.
A slight change as shown in the next photo. I reactivated the surface again with a quick spritz of water, and will continue to keep it moist for the rest of this test.
I got bored of waiting! washed it off. Then I spritzed on ONLY a bit of white distilled vinegar (no salt this time), and popped it into the ammonia chamber for a couple of hours.
This was the result. Note the patchiness. This is because it was note entirely coated, but spritzed on, so only parts of the surface have oxidised.
I applied the vinegar and salt as before, brushing on the vinegar over the whole surface, then sprinkling a little course and fine salt over it.
I then placed them on a rack inside a plastic chamber, which has a little Ammonia poured onto the bottom. The fleur de lys are not sitting in the ammonia, but above it, so only the ammonia gas is able to affect the surface. I used a lid to keep the gas inside.
Ammonia gives off an EXTREMELY stinky gas, so only do this in a very well ventilated space – preferably outside.
In the next photo, you can see the Ammonia Chamber that I used for methods 2 and 3. I place the mouldings onto a mesh so that they don’t sit in the ammonia. The ammonia is at the bottom of the plastic crate.
You can already see that there has been some change in the colours of all the metals here. The iron has gone slightly more brown, and the other three have all darkened and taken on a blue tinge.
I have to admit, I already knew how to patina with this method as I’ve used it several times before. It produces such lovely results, and I knew it would be fast working.
The colouration and texture had changed a little, but the changes were not as dramatic as the first hour. Difference was not enough to warrant a photo.
Some gorgeous colours are developing as seen in the next photo.
And this is why my favourite method is this one. Just look at these beautiful colours! I’m always surprised by just how blue and bright the verdigris can be.
Top left – Iron; Top right – Copper; Bottom left – Bronze; Bottom right – Brass. I rinsed them off with water and left them to dry.
It’s interesting that the brass verdigris had developed much more evenly that the other 3. The texture is affected by the salt, so perhaps the salt dissolved and coated the whole piece.
It’s also interesting that the Iron developed some verdigris colours. I suspect some contamination may have happened, because this result was most unexpected. It is rather beautiful though!
And here is what they look like once dried.
For this method, I simply sprayed a little water onto the mouldings to wet them down, then placed them in the Ammonia Chamber. (Next photo on the left)
As you can see in the next photo on the right, not much has happened. All three have gone slightly duller and greyer. The Copper is the one that has changed the most – turning from copper red to a dull brown.
No change. I decided this was a bit of a fail, so I sprayed just a bit of white vinegar on it for fun. No salt, just a light spray of vinegar without coating the whole surface. I thin this will eba grat way to get a lovely bit of texture.
The bleach I used for this was good old household bleach, which is a diluted form of Chlorine. It was a supermarket own brand, but any brand will do. I made a solution of bleach using approximately 3 tablespoons of bleach and 1/4 cup of water.
I poured this into the bottom of a plastic container, and placed the mouldings inside, sitting hem on top of little cups so that they would not be submerged in bleach.
I also painted some of the solution over the surfaces of the mouldings so they were completely wetted down. On with the lid, and then we wait…..
No change.
No change in any except for the Iron. You can just start to see a little orange discolouration starting to develop.
The rust is now developing in speckles, but it’s minimal.
The speckles are growing into freckles! You can also see that the rust is forming a texture that is above the painted surface. Probably not ideal because it will roughen the surface too much.
I left the piece for another day and the rust continued to develop. I then washed it off and sealed it and here is the result.
The iron was the only metal to successfully do anything really interesting when using the household chlorine bleach as a patina medium. Even then, the progress was slow and patchy, which is fine if that is the look you are aiming for.
I rather like it – it’s a subtle rust effect that looks natural and organic.
Household bleach is another form of chlorine. Since this is something most people have in their homes, i wanted to compare the effectiveness of this with the Household bleach, as it is much more concentrated.
For this method, I sprayed water on the mouldings to dampen them a little. I then poured chlorine into the bottom of the chamber, placed the mouldings on cups so they were not sitting in the chlorine, then replaced the lid.
Unlike with the Household Chlorine, i did not paint any of the chlorine directly onto the surface of the mouldings, so it’s just the gas given off by the chlorine that will affect the metals.
No Change
No Change.
There was some slight colouration on the iron, but otherwise no change. I wanted to try to accelerate things, so I painted the pool chlorine directly onto the mouldings to see if this made a difference
I left it for about 3 days and the results were much more interesting. I love how the verdigris is more subtle and paler on the copper and copper alloys. I left the BRass to develop for a bit longer than the others (about 5 days) and it developed a really pale green patina.
I made a DIY rust solution from 16 parts Hydrogen Peroxide, 2 Parts distilled vinegar, and 1 tablespoon of salt. Wait for the salt to dissolve, then it is ready to use.
I keep my rust solution in spray bottle , so I just sprayed it onto the moulding, wetting it completely. I then placed it into a container with a lid to prevent it drying out quickly. You want it to stay damp.
This one is rather satisfying as you can immediately see a reaction. The pale bits you see in teh photo below is the solution reating to teh iron and bubbling up. From past experience, the hydrogen peroxide is what causes this reation. You can use this method without it, but I have found that the hydrogen peroxide significantly speeds things up.
The rust has clearly started to develop, and there is some nice colour texture going on. You could rinse it off and seal it now, but let’s see what happens…
At this point I washed off the solution with water and left it to dry, I absolutely love how this one turned out. It’s quick, satisfying an looks beautiful. The mottled effect you can see is cause by the random scattering of salt. It’s an organic, random process with such interesting results.
Here is what is looks like after drying out. You can see that it all lightens a little during the drying process.
I used a lime sulphur plant fertiliser that I purchase from a supplier called Metalchem. First I diluted the lime sulphur at a ration of about 1 part lime sulphur to 10 parts water.
I painted the solution onto each moulding and placed them in a container. For good measure (and to make sure of the sulphur gas it will let off), I placed a cup with the rest of the diluted lime sulphur in the container too. I then sealed the lid.
Minimal changes at this stage. The Bronze (bottom left) and copper (top right) have both darkened over-all, and more so in some spots. The Brass is no darker generally, but has a few darkened areas.
Bronze and Copper have both darkened a little more. There are some nice patches developing on the copper (top right). The bronze and copper both have a slightly blueish grey “oily” looking sheen to them that is very hard to pick up on the camera.
The Brass has continued to develop darker patches.
I left it for a total of about 2 days to see what would happen, then dried it out and sealed it with a clear coat.
I think I should have removed then at 20 Hours. Whilst the textures are interesting, the Bronze and Copper developed a shiny grey crust in some areas.
You can see this crust even more dramatically on the Brass. turned a lighter grey and is very noticeable.
The Iron had begun to develop rust patches, but otherwise, not much was happening. I left it for another couple of days with no change so I decided I may not have cooked the egg enough.
Time for take 2!
This time, I boiled 2 eggs for about 30 minutes. They did indeed have a bit of a greenish grey line around the yolk this time, and were a bit stinky.
I mashed them up a bit and sprinkled them OVER the mouldings this time, burying them in partially.
I left the eggy mess with a lid on in a warm place. I didn’t need to add moisture as the eggs were warm when I put them in and condensation was always visible on the inside of the lid.
I have to say, i was a bit nervous about taking them out. I couldn’t smell any odour from the closed container when I removed it after a few days. I was apprehensive that when I opened the lid, it would be absolutely putrid. I looked like this. Parts of the egg white has turned very blue!
Whilst I was pleasantly surprised that I didn’t get a waft of overwhelming fetid stench when I opened it up, it certainly didn’t smell good.
The yolk had become a revolting paste texture, (and yes, there was a bit of holding back retching whilst I scraped it all out of the container) but it easily washed off with water.
It smelled a bit like rottign dead animal – a bit of sulphu and a bit of ammonia. Not nice. BUt! The results were
I have to admit, though this method took a while an was super stinky, it did work, and I like the was the bits of egg create a random texture depending on where contact was made between bits of egg and metal.
Use either Bronze, Copper or Brass and oxidise it using Red Wine Vinegar, Salt and an Ammonia Chamber.
Use Bronze, Copper or Brass with White Wine Vinegar and an Ammonia Chamber.
Use Bronze, Copper or Brass with Pool Chlorine Painted on and left in a Chlorine Chamber.
Use Lime Sulphur (you can also use liver of Sulphur) with Bronze, Copper or Brass.
Use Iron with Hydrogen Peroxide, Vinegar and Salt.
Sprinkle with Salt to create pitted texture and a textured colour.
Spritz your chosen patina solution over the surface (instead or painting or submerging) for a patchy texture.
Well, that’s all folks. Whew! That was a fun ride, and I really enjoyed my little journey around how to patina. I really hope you get inspired to try some of these methods out, and please do show me your own efforts. I love to see what you guys get up to.
Becky x
Comments are closed.
An awesome project here Bex, thanks for posting and sharing it. Celeita.
Thanks Celeita. It was a lot of fun, and I really hope people go and try it themselves.