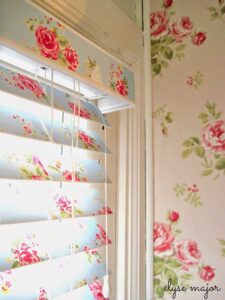
Decoupage blinds with Elyse Press Major – and firstly, a huge thank you to Elyse for being our Guest Blogger.
We are delighted to be bringing you some of the Shabby Chic worlds most creative, talented, and awesome bloggers to our very own pages! First up, is the one and only Elyse Press Major, Otherwise known as the world famous, Tinkered Treasures! If you want to read more from Elyse, Pop over to her blog, or join her on Facebook!
Check out the video at the bottom of this blog.
The wallpapes above are: Left – Savannah by Pottery Barn Kids; Right – Antique Rose Bouquet, Cath Kidston
Wallpaper…check, Blinds…check. OK let’s get started.
In a recent post (exterior illumination) I detailed my excitement over finally having ideas come together for the exterior of my Cape Cod style house. I still haven’t painted either side of the back door but I had been thinking about replacing the existing and broken mini blinds inside with something else, something with pattern. And then inspiration hit and I was out the door to the home improvement store.
Perusing the aisle of blinds I was drawn to the 2″ faux wooden ones rather than the narrow 1″ sort. The wider slats seemed right for a decoupage experiment. My next stop was the office supply store for color copies of fabric which I intended to adhere on each blind and then coat with a light finish.
I decided to keep the blinds in-tact and simply work around the cords. I started with the decorative valance which I covered with paper trimmed-to-fit and finished with a coat of Mod Podge. The paper began to bubble a bit, which happens, and so I smoothed it out using light pressure from my fingers along with the directed heat of a blog dryer. Blah. This was going to take forever. Was there a better way?
Wallpaper! Of course! No sealer-coat required! And I had a roll that I bought years ago knowing I would find a use for it someday. Now if I had a matte board and rotary cutter I suppose this could’ve been even easier but instead I tinkered and improvised: I cut sections of wallpaper small enough to fit my guillotine-style paper cutter and then trimmed to fit the two sizes of the three sections required for each slat.
Wallpapering Blinds …. An exercise in Measure…Cut…Glue!
Since I plan to shorten the length of the blinds (after I muster-up the courage), I extended them to determine just how many slats would need to be covered: twenty-three. Unroll, cut, chop. Unroll, cut, chop. Unroll … you get the picture.
For the final step, I grabbed my trusty Elmers Gel Glue Stick and affixed each piece to a slat, gently smoothing to adhere well. Was each piece the perfect fit? Of course not. Did I even attempt to match-up the patterns slat by slat? No way! This is tinkering, after all.
This weekend’s plan now includes prepping, priming and painting the back door so that I can take nice final photos and write this up as a tidy tutorial for Romantic Homes!
Hmm. Now I’m thinking the exterior of the back door will be the blue of the wallpapered blinds …
Fickle-osity continues …
xo
elyse
———————————-
If you would like the chance to be a guest blogger on our website, Get in touch! hello@chicmouldings.com
We are looking for bloggers who cover a wide range of talents, so drop us an email with a little bit about yourself, and a link to the blog you think would be a great fit to feature on our blog! We look forward to hearing from you!x


What a great idea. I recently used wallpaper on my floor . Themessybrunette.com
Hi Maura!,
I’d love to see a picture of that! It must look beautiful! Pop over to our Facebook page & feel free to share 🙂 http://www.facebook.com/chicmouldings
Sam x
Absolutely brilliant post. Blinds would never be boring again after reading this post.
Your blog is very informative. I am searching this information form few days and I found this information on your blog. Your blog is very informative. Thanks for sharing this information with us.
What to use to stick wallpaper to rollar blind
Hi Eileen. I would advise a PVA glue such as mod podge. Good luck!