how to make stencils

How to Make Stencils - Using Inkscape

In this tutorial, I will take you step by step through how to make stencils using Inkscape. 

“Hang on – why are you showing us how to make stencils? Surely you want people to buy your mouldings?” I hear you ask.

Well, sure, but I recognise that sometimes a moulding may not be in keeping with the design aesthetic that you are going for. Besides, you may want to add some stencilling around mouldings, so in fact, these two embellishment types can go very well together.

And anyhoo, this method is great for other things besides making stencils. You can use it to make a mask for around a fiddly moulding to make it easier to paint. You can also use it to create logos when a printer needs certain file types. I’ll go into that more a bit later…..

And of course, if you have a cricut or similar type cutter, you’ll already know how many crafts you find it useful for – and this method is perfect for making files to send to a cricut, laser cutter or CNC router,

Please note that this tutorial is best viewed on a Desktop or Tablet.

If you prefer to watch a video, you can go here or scroll to the end of this blog.

What is Inkscape?

Inkscape is a great quality vector graphics software. It’s open source and free to use.

Software like this can be very daunting to pick up an use to begin with. Though there are lots of online tutorials, it can be hard to know which search terms to use to find how to do a task.

Vectors vs Rasters

OK – this is the boring stuff, but it is useful to know the difference between the two. If you just want to get one with it, scroll down to “How to Make Stencils” below.

A Raster is a bitmap. You have probably heard of the file type .jpg. A jpeg is a raster type image file, and it is made up of pixels. Depending on how you are viewing an image, you can tell if a file is a raster file because when you zoom in on it, you will see pixels.

Inkscape creates a vector file. Examples of vector files are .ai, .and .svg. You can get other types of vector files too.

To make things even more complicated, some files such as .eps and .pdf can contain both vectors and rasters.

In the image below you can see the difference between a raster and a bitmap. 

The two images on the left look similar when they are small. But when those images are enlarged, you can see the quality of the raster deteriorating. Compare  the blurred edge on the larger raster file on the right.

This is why you cannot enlarge a low resolution image without losing quality. Graphics software doesn’t know where the “edge” is, because it’s made up of lots of little squares. You can see the pixels on the enlarged example in the image below

A vector, on the other hand, is made up of lines. Between these lines are POINTS (or NODES), and the points determine whether the line is straight or curved. The degree and direction of curve is controlled by a HANDLE. You’ll learn how to do this later on, but for now, you can see an example below.

Points and lines together make a PATH.

For the purpose of this tutorial, we will deal with .svg files. These are commonly used by suppliers who print and cut graphics. You will, find that you can export or save images as other types  but it’s unlikely you will need them for this purpose.

How to Make Stencils

Step 1 – Choosing an image

You will start with an image. This can be something you have drawn or a raster image file. If you have drawn the image, make it is only two colours and that the edges are as clean as possible. Then scan it into your computer and save it a .jpg. 

When selecting or creating your image, consider the following:

  • Use an image in a size that is appropriate for any details, so they don’t get lost in the stencilling process if they are too tiny. You will be able to enlarge or reduce your image once you have made it into a vector, but it can be easier to work with and trace if it is a similar size to the stencil size you are creating.
  • Make sure any parts that will become the stencil are not so thin that they will be hard to manage or cause a weak point in the stencil.
  • Consider the type of stencil you are making. If you are cutting your stencil out of an adhesive material such as masking film, you can create a design with cut-outs within cut-outs. 

If you are cutting a re-usable stencil from mylar (as in the photo below) or another reuseable material, you will need to make sure all the parts connect together.

  • How many colours is it? You will need to make this into a two colour image. A three colour image can easily be made into a two colour image, but consider what will happen to the design when you do this.
  • Is it a high resolution, clear image? The higher the resolution and the better the quality of the image, the better the image will trace (see step 3)
  • The colours must be in clear blocks with no colour gradients present.
If you would like to use the same image that I am using so you can follow this tutorial exactly, you can download it here.

Step 2 – Opening the image in Inkscape

So now we have an image to use. Now let’s open it in Inkscape. If you don’t have Inkscape installed, you can download it here.

2:1 – Once you are in Inkscape, make a new document. You will see your window with an artboard on the right and some tools on the left. You have more tools along the top, and some menus at the very top in the left.

2:2 – Select go to File> Open. Select your file and then “Open”. 

2:3 –  A dialogue box will appear. Just click OK.

Learning how to navigate.

You’ll sometimes need to zoom in and out and look at other areas in the design window to work on details.

If you have a mouse with a scroll wheel, you can use this to scroll up and down. To pan left and right, hold down  the “Shift” key while you scroll with the wheel. To zoom in and out, hold down “Ctrl” while you use the scroll wheel.

You can also use the menus to navigate. Go to View>Zoom and then select the action you wish to perform.

Step 3 – Tracing your raster to vector

Now we need to change the image from a raster to a vector. Thankfully, Inkscape has a handy built in tool to help us to do this.

3:1 – SELECT the image. You can tell when it is selected because there will be a dotted square around it, and arrows pointing out from each corner and the centre of each side.

If you wish to deselect anything, just click on something else to be selected, or click a blank space outside the image..

3:2 – If you image is not selected, click on the Select / Transform Tool in the tool box, and then Click on the image to Select it.

3:3 – Go to Path > Trace Bitmap…

A panel will appear on the right.

3:4 – I just used the default settings, though you can play around with them once you are more familiar with the program. Click on Apply.


Not much will appear to happen. But if you double click the image using the selection tool, you will notice that the image now has lots of little squares all over it. These are the POINTS  (or NODES) that the trace has created.

You may also notice that your mouse cursor changes shape. and the toolbar on the left shows the second tool down is in use. This tool is used to Edit paths by node.

So that’s great, we now have a vector, but when Inkscape traces a raster, it leaves the raster in place, so let’s remove it.

Step 4 – Separating and Deleting the Raster Image

4:1 – Using the selection tool we learned about it Step 3, Click, Hold and Drag the image to the right. 

4:2 – Then click on the raster image (which is the coloured on) and delete it by hitting Delete on the keyboard, or right click and select delete.

Click and drag the black and white vector image back onto your artboard.

Step 5 – Save the File

5:1 – To save your file, select File > Save As.

5:2 – Then save the file as you usually would. You will save it as a .SVG file. Either option (Inkscape or Plain) should do.

.SVG – stands for “Scalable Vector Graphics” Many laser cutters, vinyl cutters and printers can use this format. You can also use this format for your Cricut machine.

You now have a vector file, and this can be used as it is. However, you may want to add colours if you are using it to create a vinyl cut print or logo. You may also find there are some bits that didn’t trace so well, and I will show you how to edit the image to make it perfect. And of course you’ll need to know how to resize it to the dimensions you need. Dear crafter, read on.

Firstly, let’s improve the image. Here is what I want to do:

Step 6 – Changing Fill and Stroke Properties.

To be able to see the edges more clearly, I like to use an outline, without a fill.

6:1 – Using the Select Tool, click on the image to select it.

6:2 – Go to Object > Fill and Stroke… to open up the Fill and Stroke Panel on the right.

6:3 – Now lets make this into an outline. See the video below for the moves I am about to describe.

i – Click on the X on the Fill Tab of the Fill and Stroke Panel. Your butterfly will disappear. Don’t panic! It is still there, It just has no colours assigned to it.

ii – Next click on the Stroke Tab and then click on the first square to assign a flat fill.

iii – I like using a narrow stroke, so click on the third tab (Stroke Style) and reduce the thickness of the stroke as shown in the video clip.

You should now have an outlined image.

For those of you wishing to use this tutorial for logos or other vector media, you can play around with the properties in the Fill and Stroke panel. Here are some of the things you can do using this panel:

Fill Tab

  • Change fill colour
  • Apply Gradient Fill
  • Add Patterns
  • Change fill transparency

Stroke Tab

  • Change stroke colour
  • Make a Gradient Stroke Colour
  • Make a stroke Pattern
  • Change stoke transparency

Stroke Style

  • Change the width of the stroke
  • Make the stroke a dashed or dotted line
  • Change how a join looks (rounded, mitred or bevelled)
  • Change how a cap (the end of a line) looks (square, rounded or butted.

Step 7 – Isolate and Delete a Path

Now to isolate that blob so we can get rid of it.

7:1Select the image with the Select and Transform Tool. If you want to select more than one object, hold down the SHIFT key as you click on more images to add to the selection.

7:2 – Go to Path > Break Apart. You will see the image change to look like below left with lots of dotted squares. This is because each path is now a separate object.


7:3 – Using the Select Tool, click on any object you wish to remove, and hit Delete on your keyboard, or right click > Delete.

I’ve selected that random blob and deleted it.

Step 8 – Drawing Shapes

There are several ways to create shapes in Inkscape. Have a look at the tool box on the left. You’ve already met the top two tools. Now let’s meet some of the others.
 
In the demo below, I’ve only picked the tools that I think will be most useful for creating stencils. I’ll go into them in detail further along.
 
NOTE: As you watch the video, note the area between the menu and the horizontal ruler. You will see the contents change. We’ll call this the Tool Controls Bar. This is how you will control things related each tool.

Click on the different tools, and notice the Cursor and the contents of the Tool Controls Bar change. The chart below will give you a brief rundown or the tools that I think are most useful for creating stencils.

Icon

Tool Name

About the Tool

Tips for Use

Rectangle Tool

Purpose:

Draw Squares and Rectangles

Tool Controls:

Set Dimensions

Set Corner Radius

To draw a perfect square, hold down the CONTROL key as you draw the square.

For more information about what this tool can do, click here.

Ellipse Tool

Purpose:

Draw Circles, Ellipses and Arcs

Tool Controls:

Set Dimensions

Make a “Pie Wedge”

To draw a perfect circle, hold down the CONTROL key as you draw the square.

Find out more about drawing Arcs and Wedges here.

Polygon / Star Tool

Purpose:

Draw Stars and Polygons and Triangles.

Tool Controls:

Select Star or Polygon

Set Corner Quantity

Set Spoke Ratio (i.e. how “spikey” or “chubby” a star appears)

To point the tip of a star up or down, hold down CONTROL while you click and drag the cursor straight up or down.

You can do so much more with this tool, it’s a whole separate tutorial! Go here for more guidance.

Pen Tool

Purpose:

Draw Bezier Curves and Straight Lines

Tool Controls:

You can select different Modes for this tool.

See Step 11 for more information on using this tool

I’d also suggest playing with the other tools to see which you prefer, and you can find out more here.

Pencil Tool

Purpose:

Draw Freehand

Tool Controls:Tool Select from 3 Modes.

If you’d like more information on this tool, go here.

Text Tool

Purpose:

Create Text and Numbers

Control Bar:

Typeface

Weight

Size, Alignment

To change font, size etc, highlight the text before using the Toll Controls Bar.

For more detailed directions, go here.

To make the shape I want, I’ll be using the Pen Tool in Bezier Mode.


I’ll click (straight lines), or click and drag (curves) to create the shape I want. I’m aiming to make a shape that covers the parts of a shape that I want to remove. Here is my result. (The red colour is to highlight it only)

Step 9  – Dividing Shapes.

9:1 – Now, select the Selection Tool and click on the shape you want split, and the shape that will create the split.

9:2  – Go to Path > Division. This will create three shapes using the parts where the shapes overlapped to create the divide.

9:2  – With the shape between selected, hit Delete, and the shape is now split into two parts.

Note – If you have a shape that you wish to split, but you don’t want to lose a chunk of the shape to be split, you can use a line instead of a shape in the same way. We’ll do this a bit later.

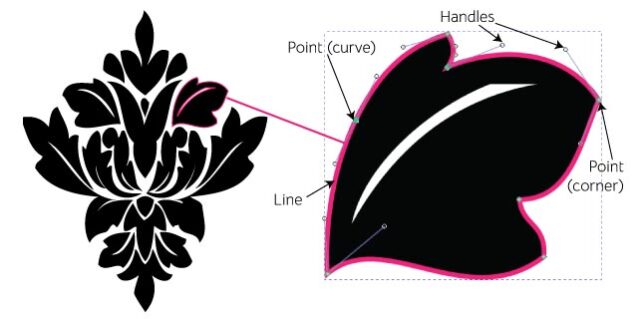
Step 10 – Using Nodes and Handles to Edit Shapes

Sometimes the trace tool doesn’t quite get it right – especially with poor resolution or detailed images.

1 – To edit your image, first select the “Edit Paths by Node” tool, and click on the image to select it.

As before, you will see the little square points pop up all around the edges of the image.

2 – If you need to, zoom in to get a good view of the points.

3 – You can select one node by clicking on it. It will change from grey to blue and yellow, indicating that it is selected.

You can then use the arrow keys, or click and drag the selected node, to move it around.

4 – You can select multiple nodes at once by either clicking and dragging the node tool cursor across the points to be selected. Or you can select one point then hold down Shift Key while you click other points to add to the selection.

Again, you can use the arrow keys to move the nodes together. or you can grab one node and drag it around. The other nodes will move in unison.

Step 11 – Editing Paths Using Nodes and Handles

Now, these outlines need to be refined a bit. I’m only going to refine the left hand side of the image, then I can copy and flip it so it is symmetrical.

Zoom in on the area shown below, the Select the same shape as shown using the Edit Path Tool.

Next, click on the node I have highlighted in the image below.

I want to change the curve of this line, so  I need to be able to manipulate it from both sides. To do this I need 2 handles, so I will change the node type.

Follow the steps illustrated below.

Now try clicking, holding then dragging the handle around to see what happens. It takes a bit of practice to get used to editing Bezier curves, but it won’t take long before you get the feel of how to change the angles length and depth of curves to suit.

You can see what I did to tidy up the image in the video below, and I have popped in a few pointers along the way.

Step 12 – Make the Image Symmetrical – Flip and Merge

Now I have edited one side, I need to remove the other side, copy the edited side and flip it so I have a mirrored copy.

12:1 – To define where to divide the body in half, you’ll need to draw a vertical line.

Select the Pen Tool, then draw a line where the split will be (click to place first point  then click to place the second point, then Enter.)

Tip – If you hold down the Ctrl key, you this will restrict the angle at which your next point lies from the first one. This makes it super-easy to achieve a perfectly vertical line. 

If you need to, click and drag the line to adjust its position. Wherever it lies will be where the split will occur.

12:2 – Now, with the line AND the butterfly outline selected, go to Path > Division.

12:3 – Next, with the Select Tool, click and drag a square around all the paths on the right hand side to select them, and Delete them.

12:4Select the rest of the butterfly, and COPY and PASTE it. (Ctrl C, Ctrl V)

12:5 – Select the copied part (if not still selected after pasting), then go to Path > Flip Horizontal. (You can also just click on the Flip selected objects horizontally button  or press “H” on your keyboard.)

Note – if you are finding it tricky to keep all your paths together, you can always Group or Ungroup as necessary. Simply select the paths you wish to group together then go Object > Group (Or Ctrl + G) or Object > Ungroup (Ctrl + Shift + G)

12:6 – Select the flipped piece, and  drag it so it fits perfectly next to the other side. It will usually want to conveniently lock exactly where you want it.

12:7 – Now select each outline piece, and go to Path > Union.

Your outline should now be one piece. Hooray! That’s all our editing done! Just a couple more things to do to make it ready for cutting.

Step 13 – Add a Border and Set Dimensions

First, to make handling easier, I will select all the paths (Step 9) and group them using Object > Group or by hitting Ctrl+G (Step 12:5). 


I want to use this stencil on an panel sized 120mm W x 140mm H. I am going to use the stencil edge to align my stencil, so I will cut the edge of my stencil out to that size. 

To draw the border, use the Rectangle Tool that we looked at in Step 9 and click and drag to draw a square around the butterfly. Then, using the Tools Control Panel, I’ll enter the dimensions I want it to be.

TIP – You can also adjust dimensions when you are using the Select Tool. If you wish to adjust dimensions proportionately, click on the PADLOCK between the width and height to link them.

Step 14 – Rotate and Resize.

Now to set up the final stencil. I want to enlarge the butterfly and rotate it. I’ll do this by eye rather than entering a dimension as we did in Step 13.

1 – To adjust the size use the SELECT tool click on a butterfly.

You will see arrows pointing outwards around the selection box. You can now click and drag an arrow on the corner or side to change the size.

If you want to keep the width to height ration, hold down CTRL while you do so.

2 – To adjust the Rotation, Click it again and you will see the direction of the arrows change to point around the selection box. You can click and drag those arrows to rotate the object.

You can see this in the video below.

And that’s it! Don’t forget to save your file again.

Here is a picture showing the negative space of the stencil. 


You now have a vector file that you can use on cutting machines such as a cricut, or you can send them to your cutting service. You may need to convert your .SVG file to a format appropriate for your cutting machine, for example the ScanN Cut. This is easy to do, and a quick google search will provide plenty of help with that.

The beauty of this is that now I have digital file that I can resize to different projects as required. It’s a great way to get absolutely unique artwork onto your projects. It’s also very handy if you cannot find the right stencil “off the shelf”.

What do I cut my stencil out of?

It wouldn’t be a complete tutorial about how to make stencils if I didn’t mention materials to make them from.

Adhesive stencils

Masking Film

  • You will also need Application tape to use alongside your masking film. This prevents the thin film from distorting when you take it off the backing paper and apply it.
  • I’ll do a short video about that asap.
  • Results in a very clean edge, especially if you seal the edges of the film with your background colour or a clear coat before painting the stencil colour/s.
  • Good for conforming around curves
 

Non-adhesive Stencils

You can use a re-placeable spray adhesive to help keep the edges down while you paint. Adhesive build up will need to be removed with acetone. Acetone does melt some plastics such as styrene, so please test first.

Mylar (see photo at top of the blog)

  • This is the most common material for stencils.
  • It’s flexible, durable and reusable.
  • 125 – 250 microns seem to be the common weight used.
  • Cannot be used for designs with floating details, unless you treat floating parts as extra stencils.

Polypropylene

  • 350 micron seems to be a common weight.
  • Very durable.
  • Can be hard work to cut details by hand. Make sure the weight you use is suitable if you are using a cutting machine.
  • Cannot be used for designs with floating details, unless you treat floating parts as extra stencils.

Foam PVC

  • Easy to hand cut, especially as the lower weights, since it is a hard foam product.
  • Can be heated and bent to conform to a curve which it will keep when cooled.
  • If trying this in a cutting machine, make sure it’s an appropriate thickness for that machine.
  • Cannot be used for designs with floating details, unless you treat floating parts as extra stencils.

Silkscreen Stencil

  • Note – I have not used or made silkscreen stencils myself, but you can use this method to create a file to send to a supplier who can make a silkscreen stencil for you.
  • Re-useable
  • Will not need tabs for floating parts of the image

Hand Cutting

You can use a print-out of your vector as a template to cut stencils. At a pinch, you can even use materials lying around at home, like card or plastic packaging.

For masking tape, just lay down overlapping rows onto a clean surface, adhesive side down. Place the print over the top, and cut out the stencil.


Here’s my stencil cut from masking film. Here you see 3 examples on the left.

Top left, I have weeded out the negative areas, top right I have applied the transfer tape.

Sometimes, you can save the part you have weeded out to use as another stencil too!

To the right is the stencil applied to my surface, ready to paint.

I hope this tutorial helps crafters out there learn how to make stencils from scratch. There are so many useful tools that I have not even mentioned, so if you are struggling to do what you need to, you can send an email to ask.

Watch out for the next tutorial, where I will show you how to cut, prepare and apply your custom stencils.

Happy Crafting and thanks for reading.

Becky 

how to make stencils